
| Important Access Services 2010 and Access Services 2013 are being removed from the next release of SharePoint. We recommend you do not create new web apps, and migrate your existing apps to an alternative platform, such as Microsoft Power Apps. You can share Access data with Dataverse, which is a cloud database upon which you can build Power Platform apps, Automate workflows, Virtual Agents, and more for the web, phone, or tablet. For more information, see Get started: Migrate Access data to Dataverse. |
|---|
In Access web apps, an autocomplete control shows choices as someone types so they can find the correct values. Picking the right value from a long list of related items can be difficult. Autocomplete controls help with that task. For example, with this autocomplete control for shipping zones, if you type "m," you see four choices.
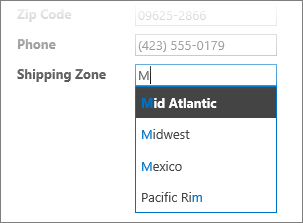
If you add "e" to the "m" to form "me," the list narrows to Mexico only. If you type "mo," all choices disappear from the box because there isn't a match.
Note
Autocomplete controls are available only to Access web apps and not in Access desktop databases.
Add an autocomplete control to a view
To add an autocomplete control, edit the view in Access and add the control from the Controls gallery.
- Start Access, and open the web app.
- Click the table caption name in the Table Selector in the left pane. Then click the view in the View Selector.
In this example, Tasks is the table, and List is the view where you want to add the autocomplete control.
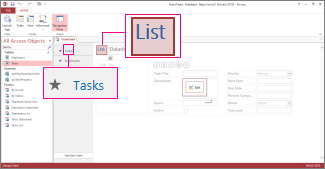
- Click Edit in the middle of the screen to open the view in design mode.
- Under View, click Design > AutoComplete Control.
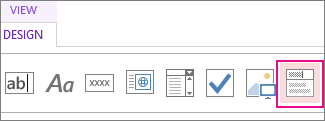
- Move the new autocomplete control to the position that you want.
- Optionally, add a label control by clicking the Label button in the Controls gallery. Then move the label next to the autocomplete control. Enter a caption that helps explain how to use the autocomplete control.
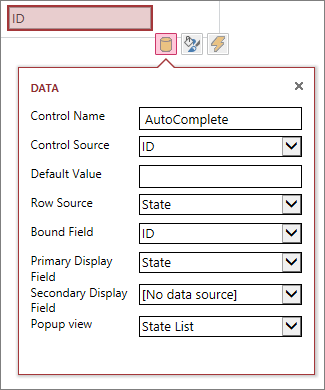
- Click the autocomplete control that you added on the design grid. Then click the Data icon next to it to open its property options. This is where you'll connect the control to its data source.
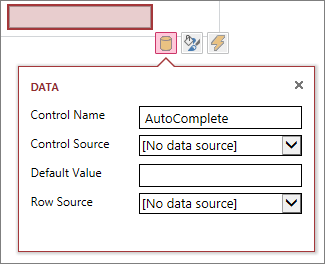
- To bind the autocomplete control to a field so that the selected value is stored in that field, click Control Source. Then select the field where you want to store the value.
- Click Row Source, and select the table or query that contains the values that you want to appear as users type in the autocomplete control. After you select a table or query, Access displays additional property options.
- In the Bound Field box, select the field that contains the values that you want to store from the list. The bound field is the value that Access stores in the control source field that you defined earlier. In some cases, this is the ID value, depending on how you designed your tables and lookup fields. In the Primary Display Field box, select the field that contains the values that you want to display from the related table or query. These are the values that users see when they use this control in their browser.
- Click Save on the Quick Access Toolbar to save your view changes.
Using an autocomplete control in your browser
As you enter text in the autocomplete control:
- The more characters you type, the more the list narrows.
- The search isn't case-sensitive. Uppercase and lowercase letters are treated the same.
- If there are more than 8 matches, a message appears at the bottom of the list and suggests a more specific search. In that case, keep typing more characters.
Set additional options for the autocomplete control
- In the Default Value box, you can enter a value to use as the default when a new record is created. If you're using an ID value as the bound field, use the appropriate ID value from the related table.
- In the Popup View box, you can choose a view that opens in a new window when you click the value shown in the box, except in Datasheet view. When you add a view name as a popup, the display options are formatted as a hyperlink in your browser to show that it's clickable.
For example, clicking someone's name in the List view could show all the details for that person. It's like choosing that person's record from the List view. If the view also contains related items, those rows also appear in the popup window.
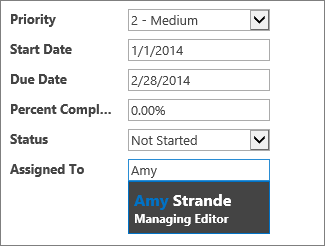
- In the Secondary Display Field box, you can choose a secondary field to appear below each item. For example, if an employee's record has a field for their job title, you could choose the Job Title field as the secondary display field.
Here's an example that shows a secondary display field. Amy Strande's job title, "Managing Editor," is pulled from the Job Title field in Amy's record and is shown under her name. The secondary display field is available only in an autocomplete box while choosing values.
- In the Formatting properties, use the Hint box to enter descriptive text that helps users understand how to use the autocomplete control. The default text is "Find...", but you can change it to something that better fits your needs, such as "Enter an employee name."
An alternative to an autocomplete control is a combo box, which lets people click to see a drop-down list of choices, such as country/region names. To learn more about combo boxes, see Add a combo box to a view in an Access app.