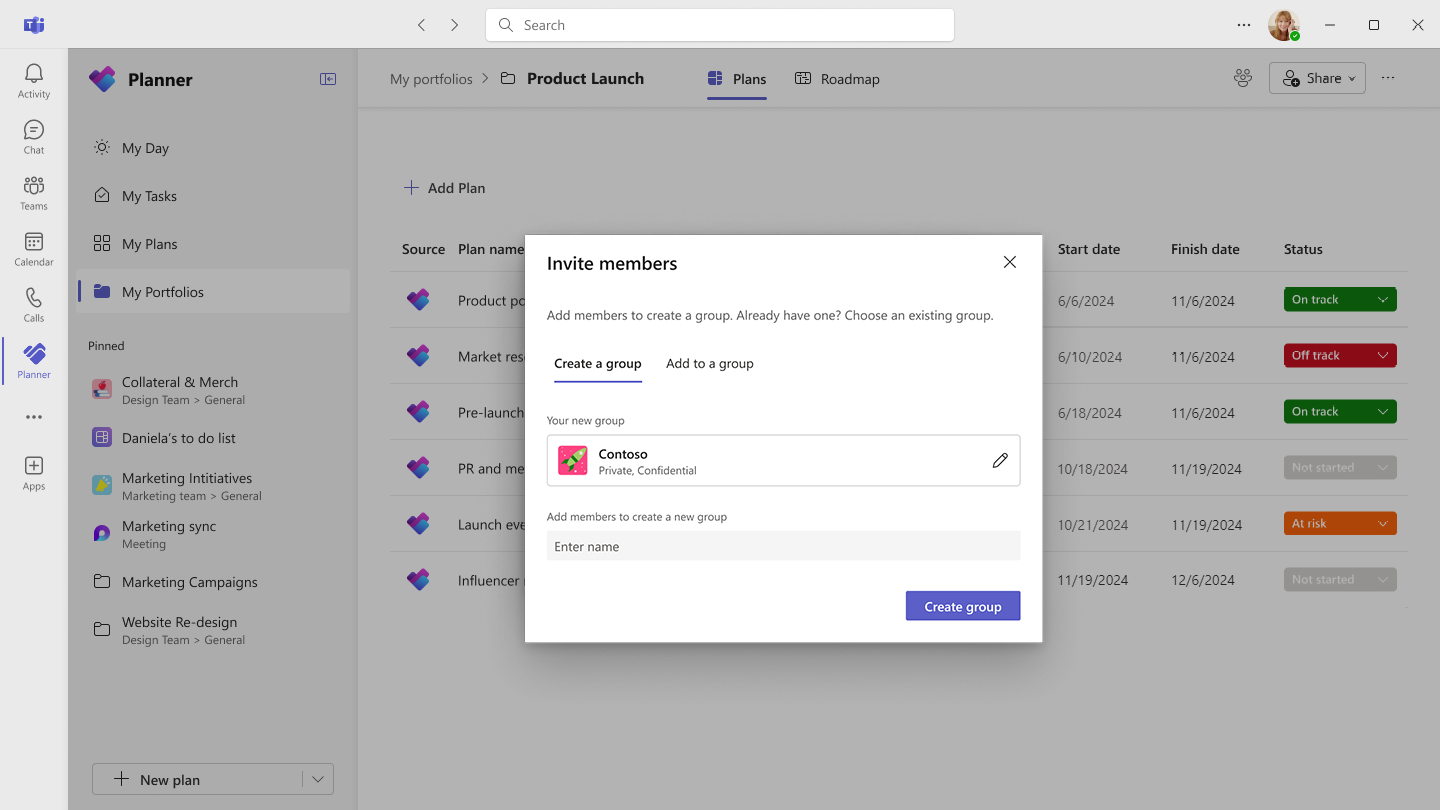
Portfolios in Microsoft Planner provide a powerful way to track key deliverables and milestones across multiple plans. With portfolios in Planner, you can monitor critical plan details, such as percent complete and status, giving you deeper insights into project progress. Plus, since portfolios are built directly into the Planner app, you can seamlessly manage tasks, plans, and portfolios all in one place—whether you're working in Planner for the web or in Microsoft Teams.
To help you stay organized and in control of your plans with a unified project management experience, this guide will walk you through how to:
Create a portfolio in Planner
To get started, open Planner in Teams or go to planner.cloud.microsoft to access Planner directly from your browser. If you have a Planner and Project Plan 3 or Planner and Project Plan 5 license, you’ll see the My Portfolios tab in the left navigation pane, directly below My Day, My Tasks, and My Plans.
Then, follow the steps below:
-
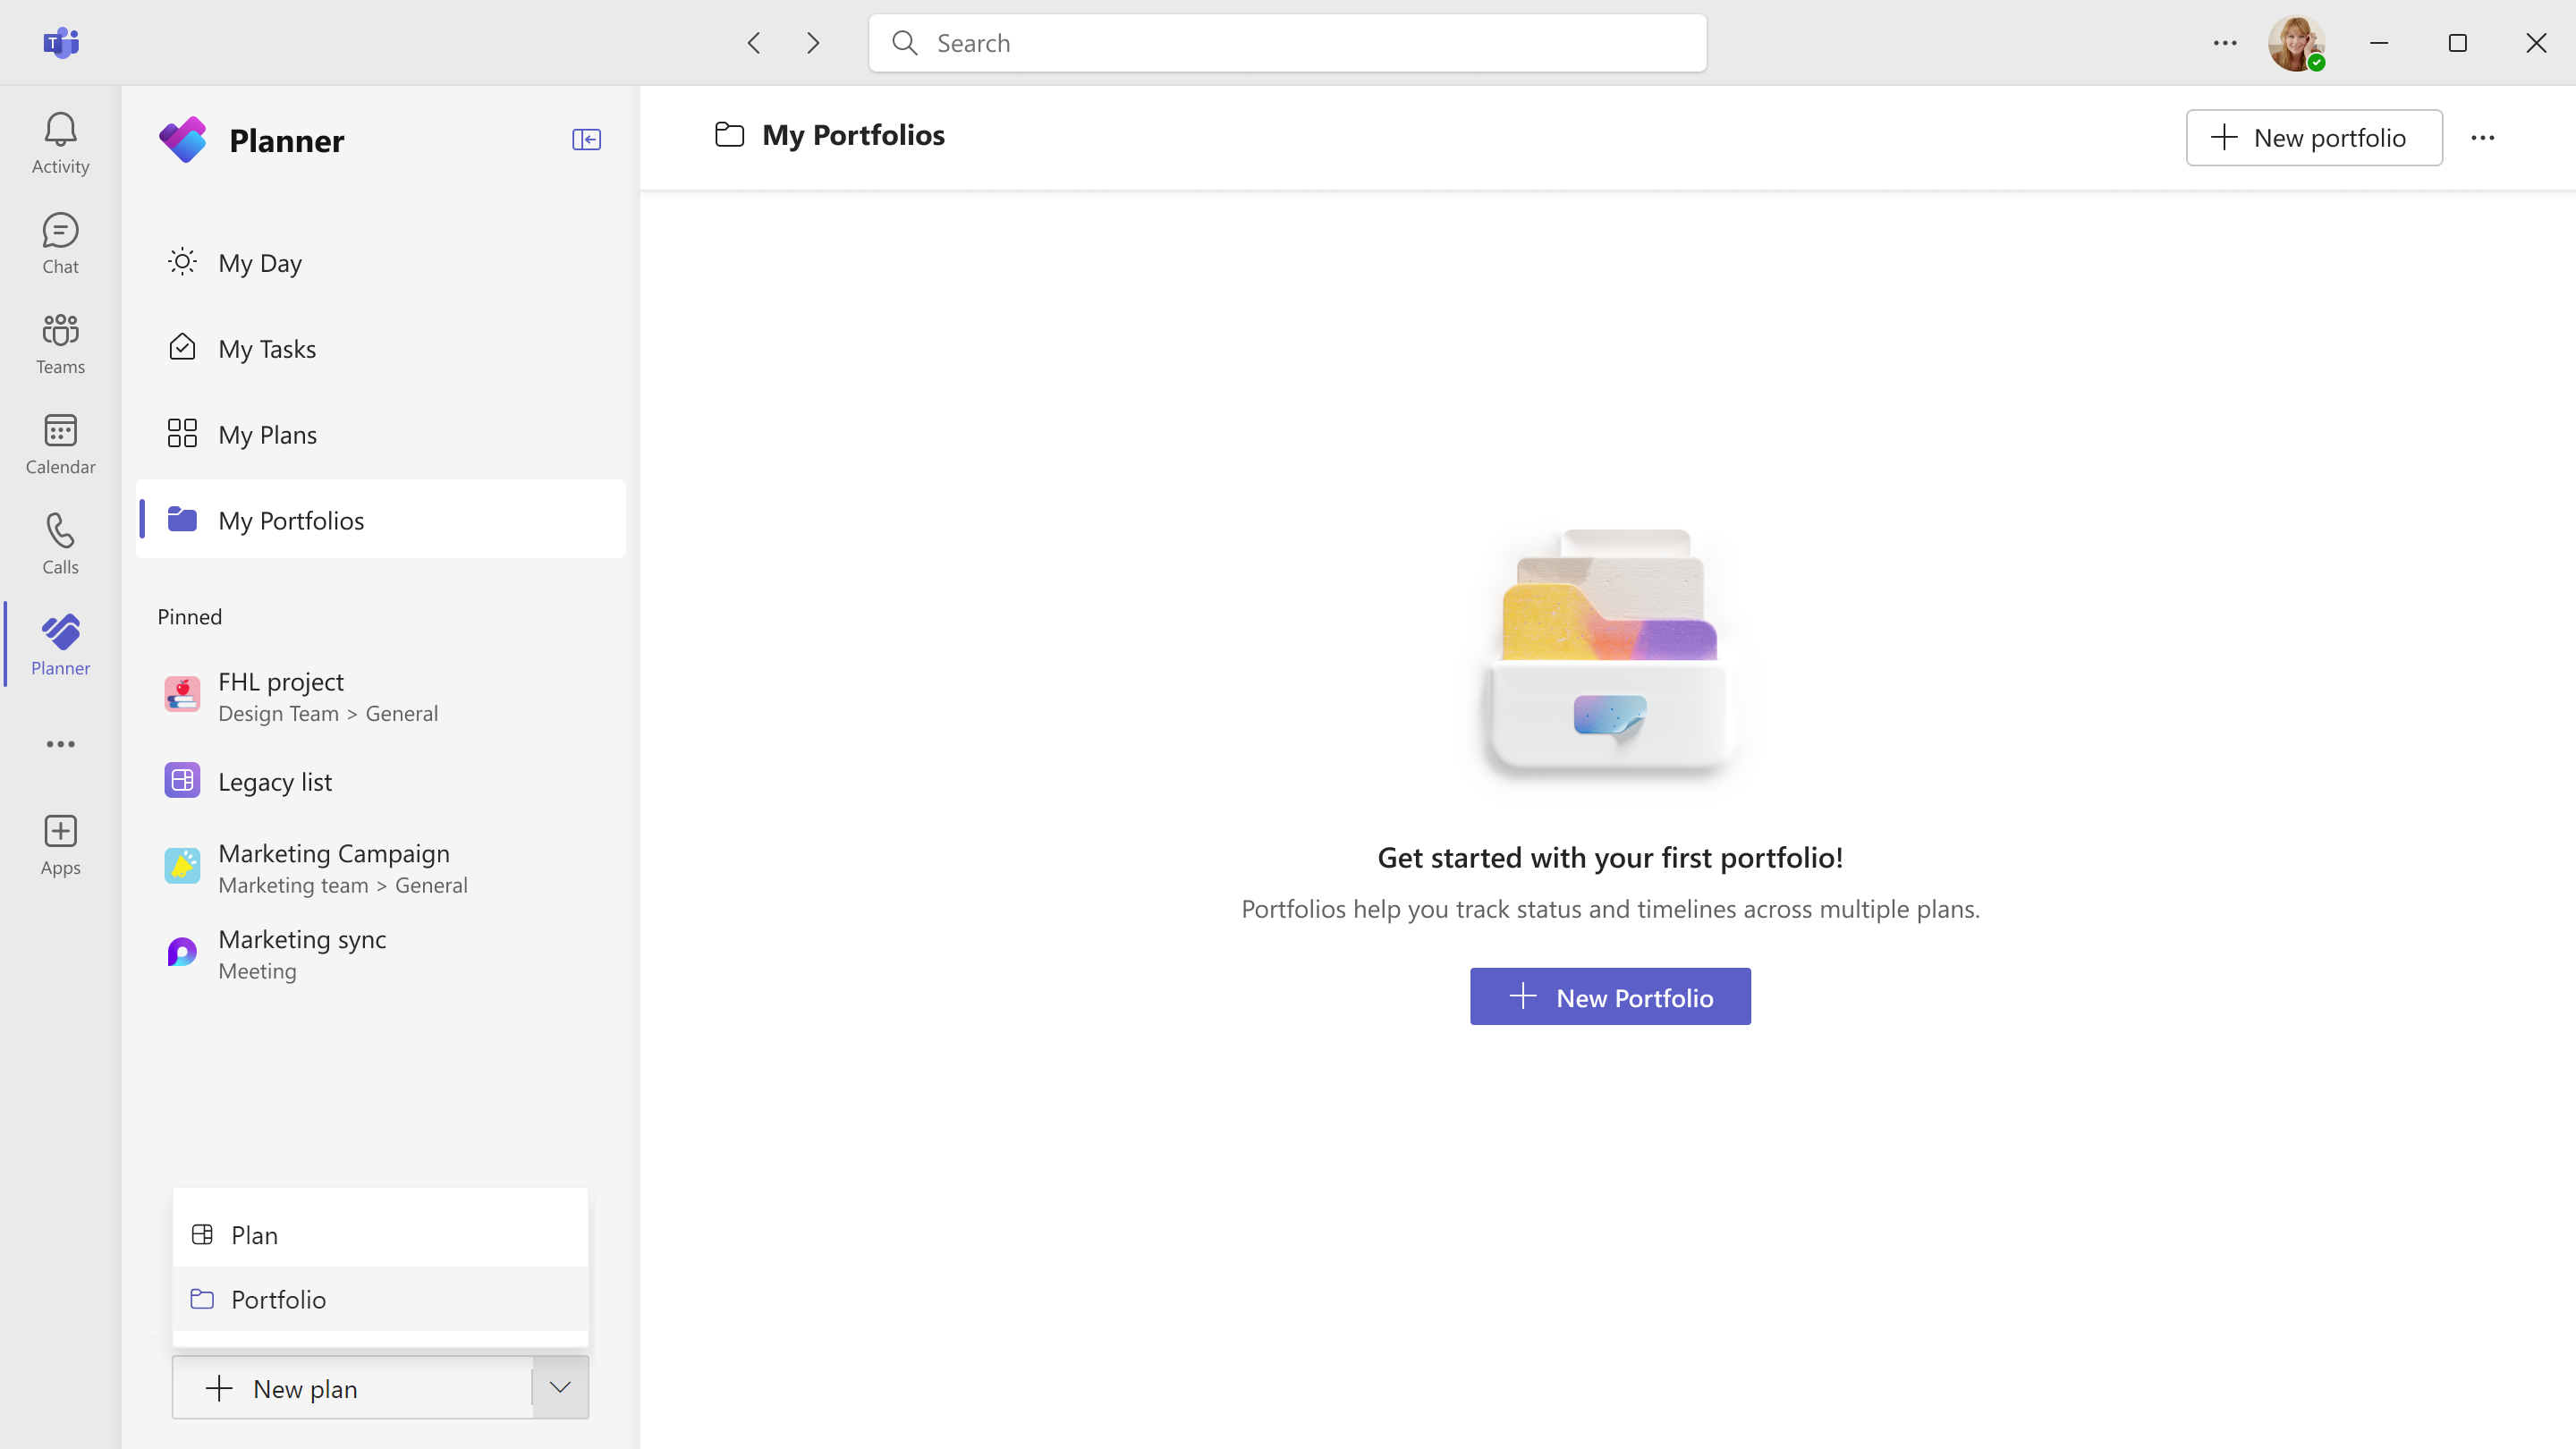
Select the My Portfolios tab, then select the + New portfolio button in the top right corner.
-
Enter a meaningful name for your portfolio.
-
If you want to share the portfolio with an existing group, select the appropriate group from the dropdown, then select Create.
Tip: Alternatively, you can use the dropdown menu next to the + New plan button at the bottom of the left navigation pane and select Portfolio.
Once the portfolio is created, you can start adding plans and tracking progress efficiently.
Add plans to a portfolio
To add plans to your portfolio, use the following steps:
-
Navigate to the Plans tab within your newly created portfolio.
-
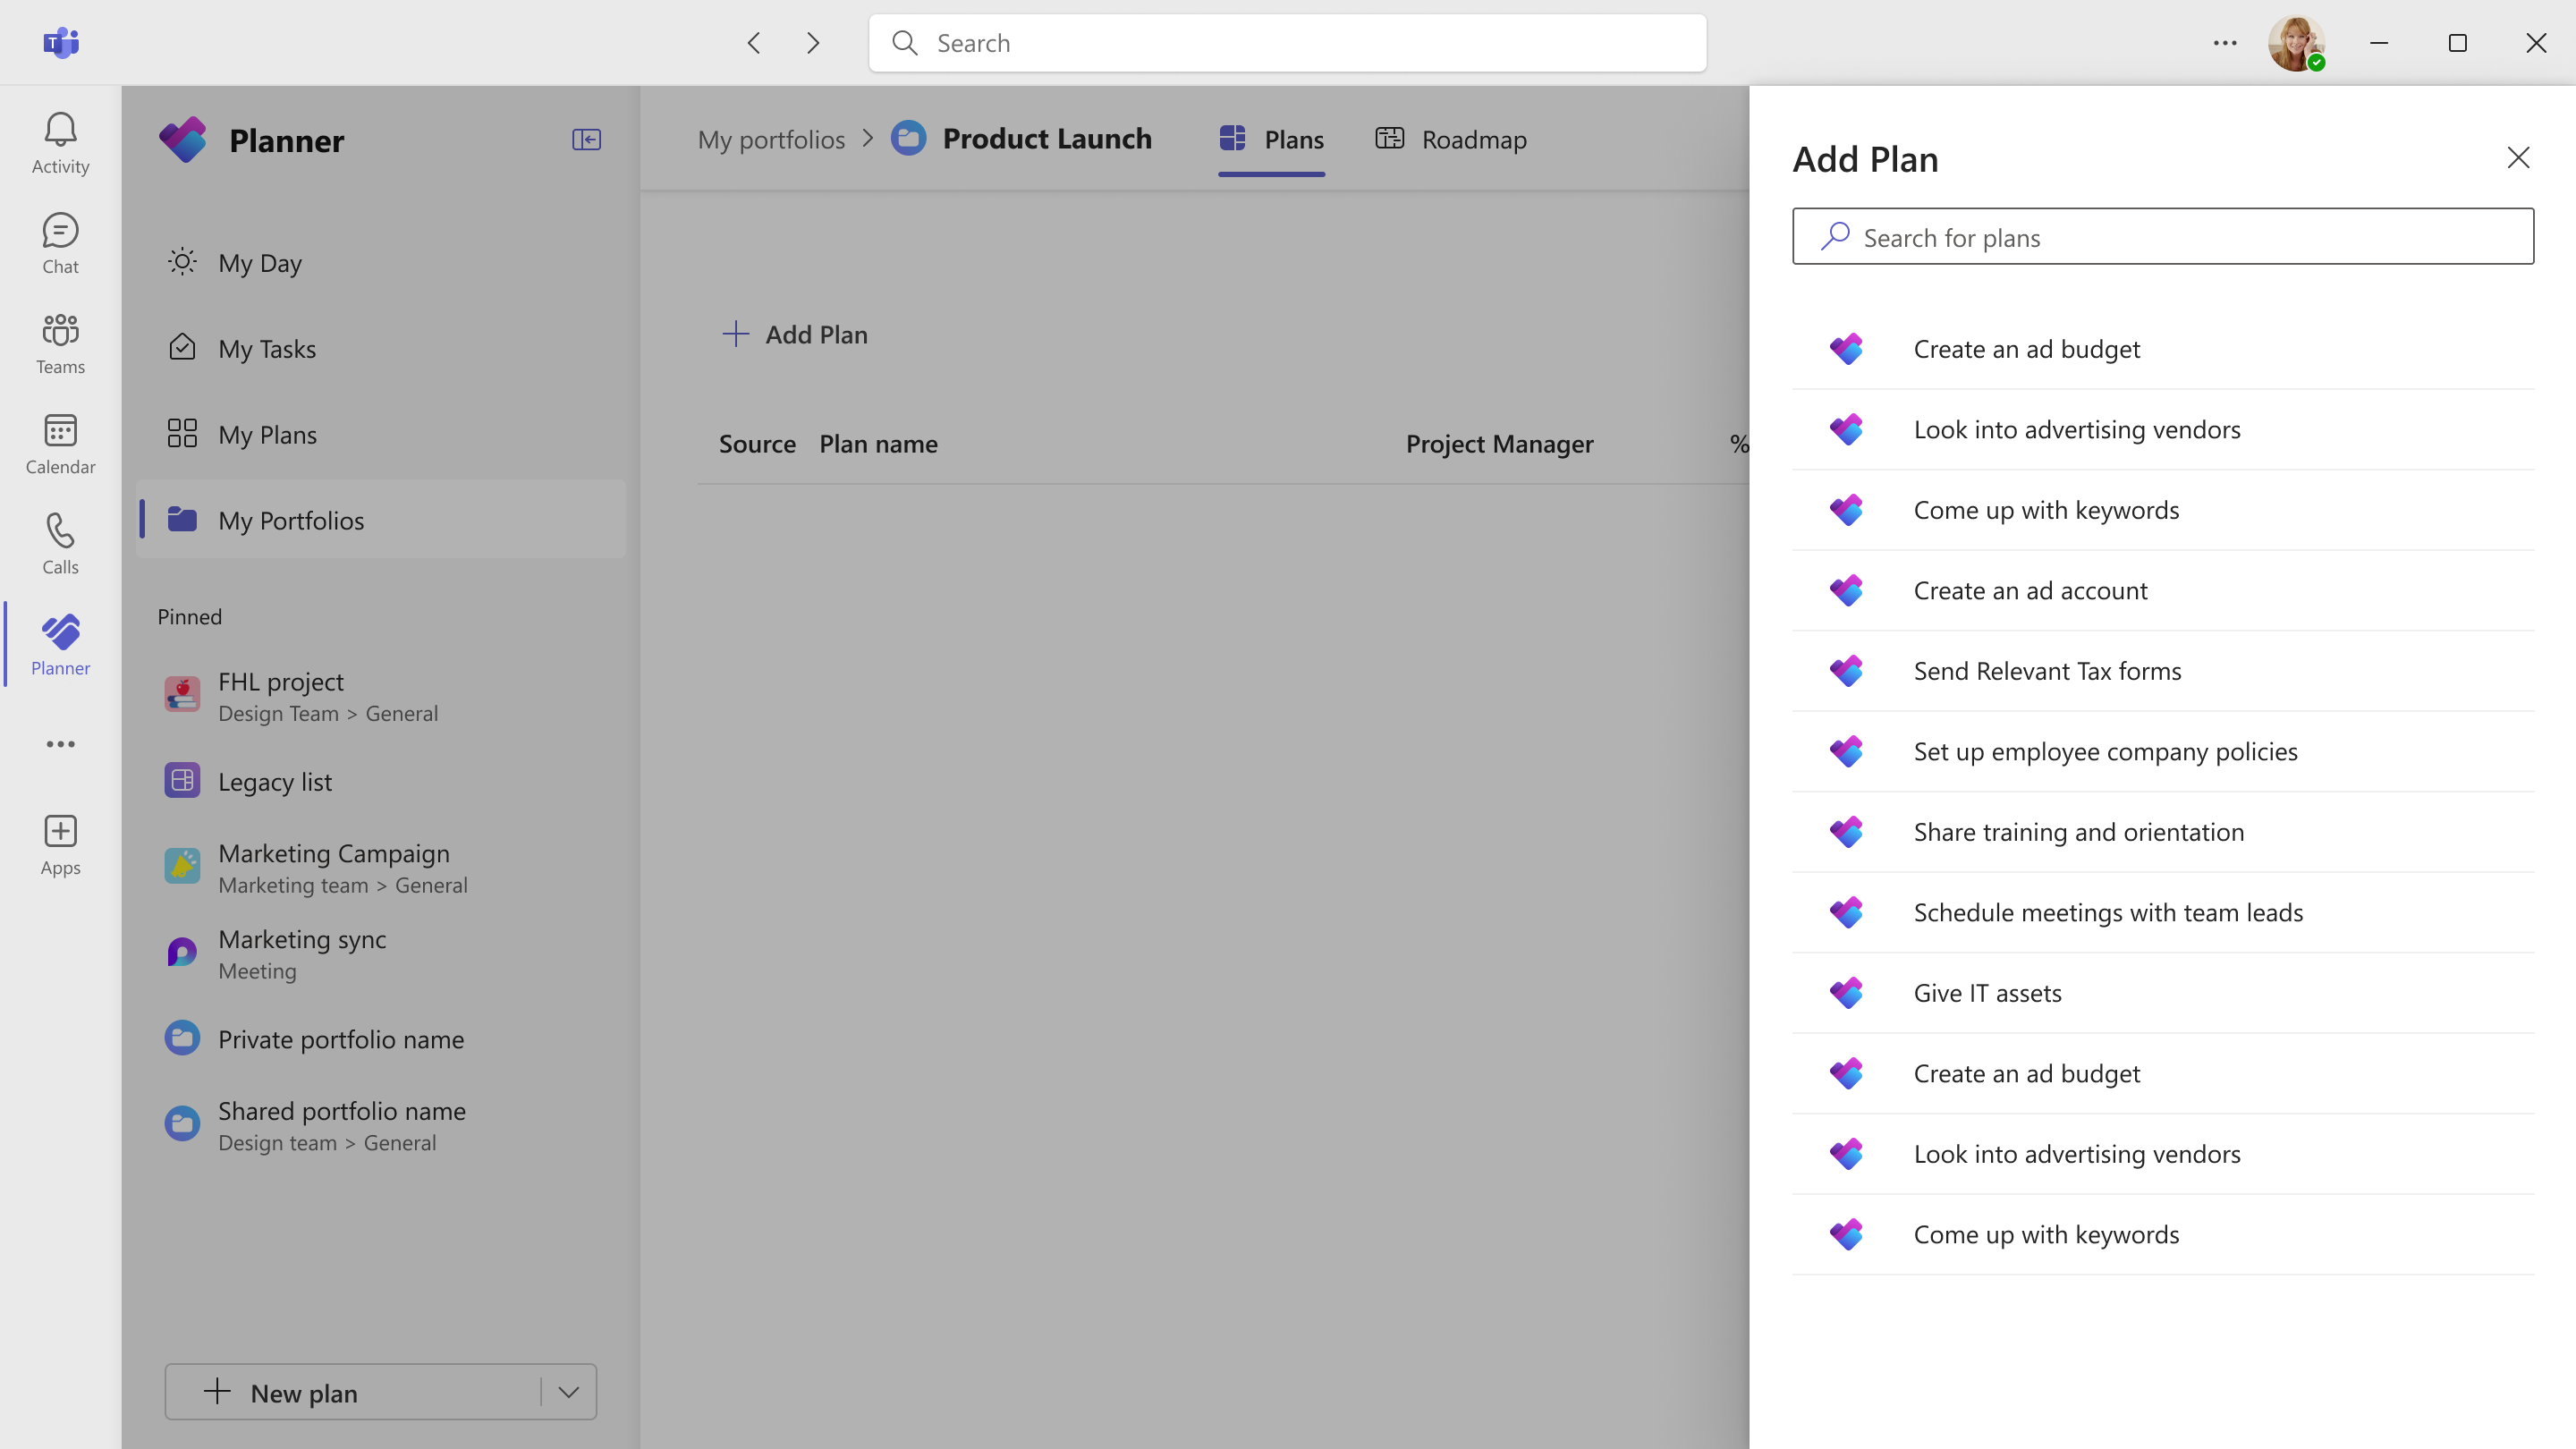
Select the + Add Plan button to view a list of all premium plans available to you—including plans you’ve created and those shared with you.
-
Select the name of the plan you want to add.
-
Select Connect to link the plan to your portfolio. This sets up a scheduled flow to keep your portfolio data up to date.
Note: Portfolios give you a consolidated view of all your premium plans and tasks; basic plans aren't currently supported. Additionally, connecting to Azure DevOps (ADO) projects and Project Online projects aren't supported.
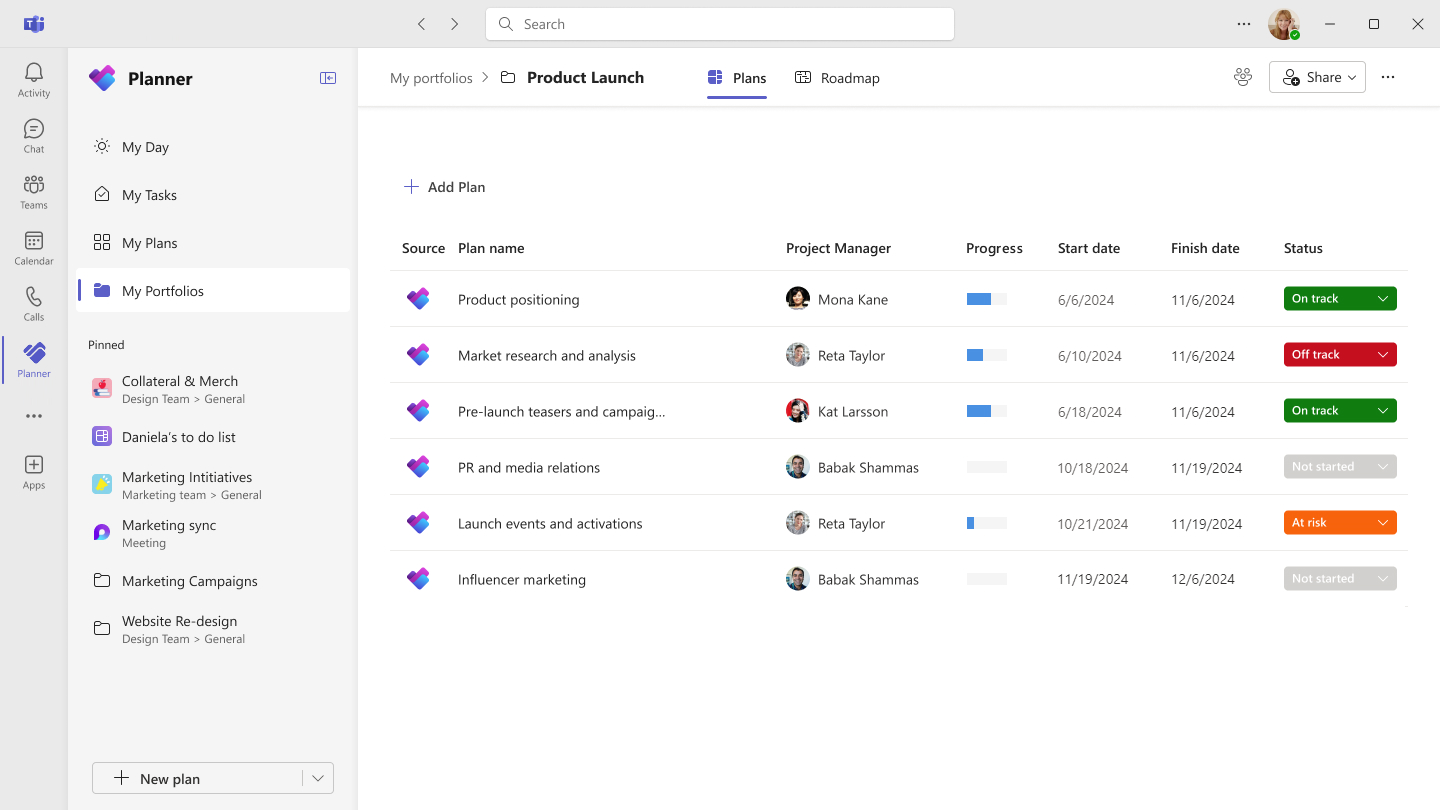
Once a plan is added, key attributes will be displayed, including:
-
Project Manager
-
Progress (percent complete)
-
Start date
-
Finish date
These fields are view only within the portfolio and can't be edited. However, you can manually set the Status field to track progress using the following options: Not started, On track, At risk, Off track, and Closed.
Build a roadmap view
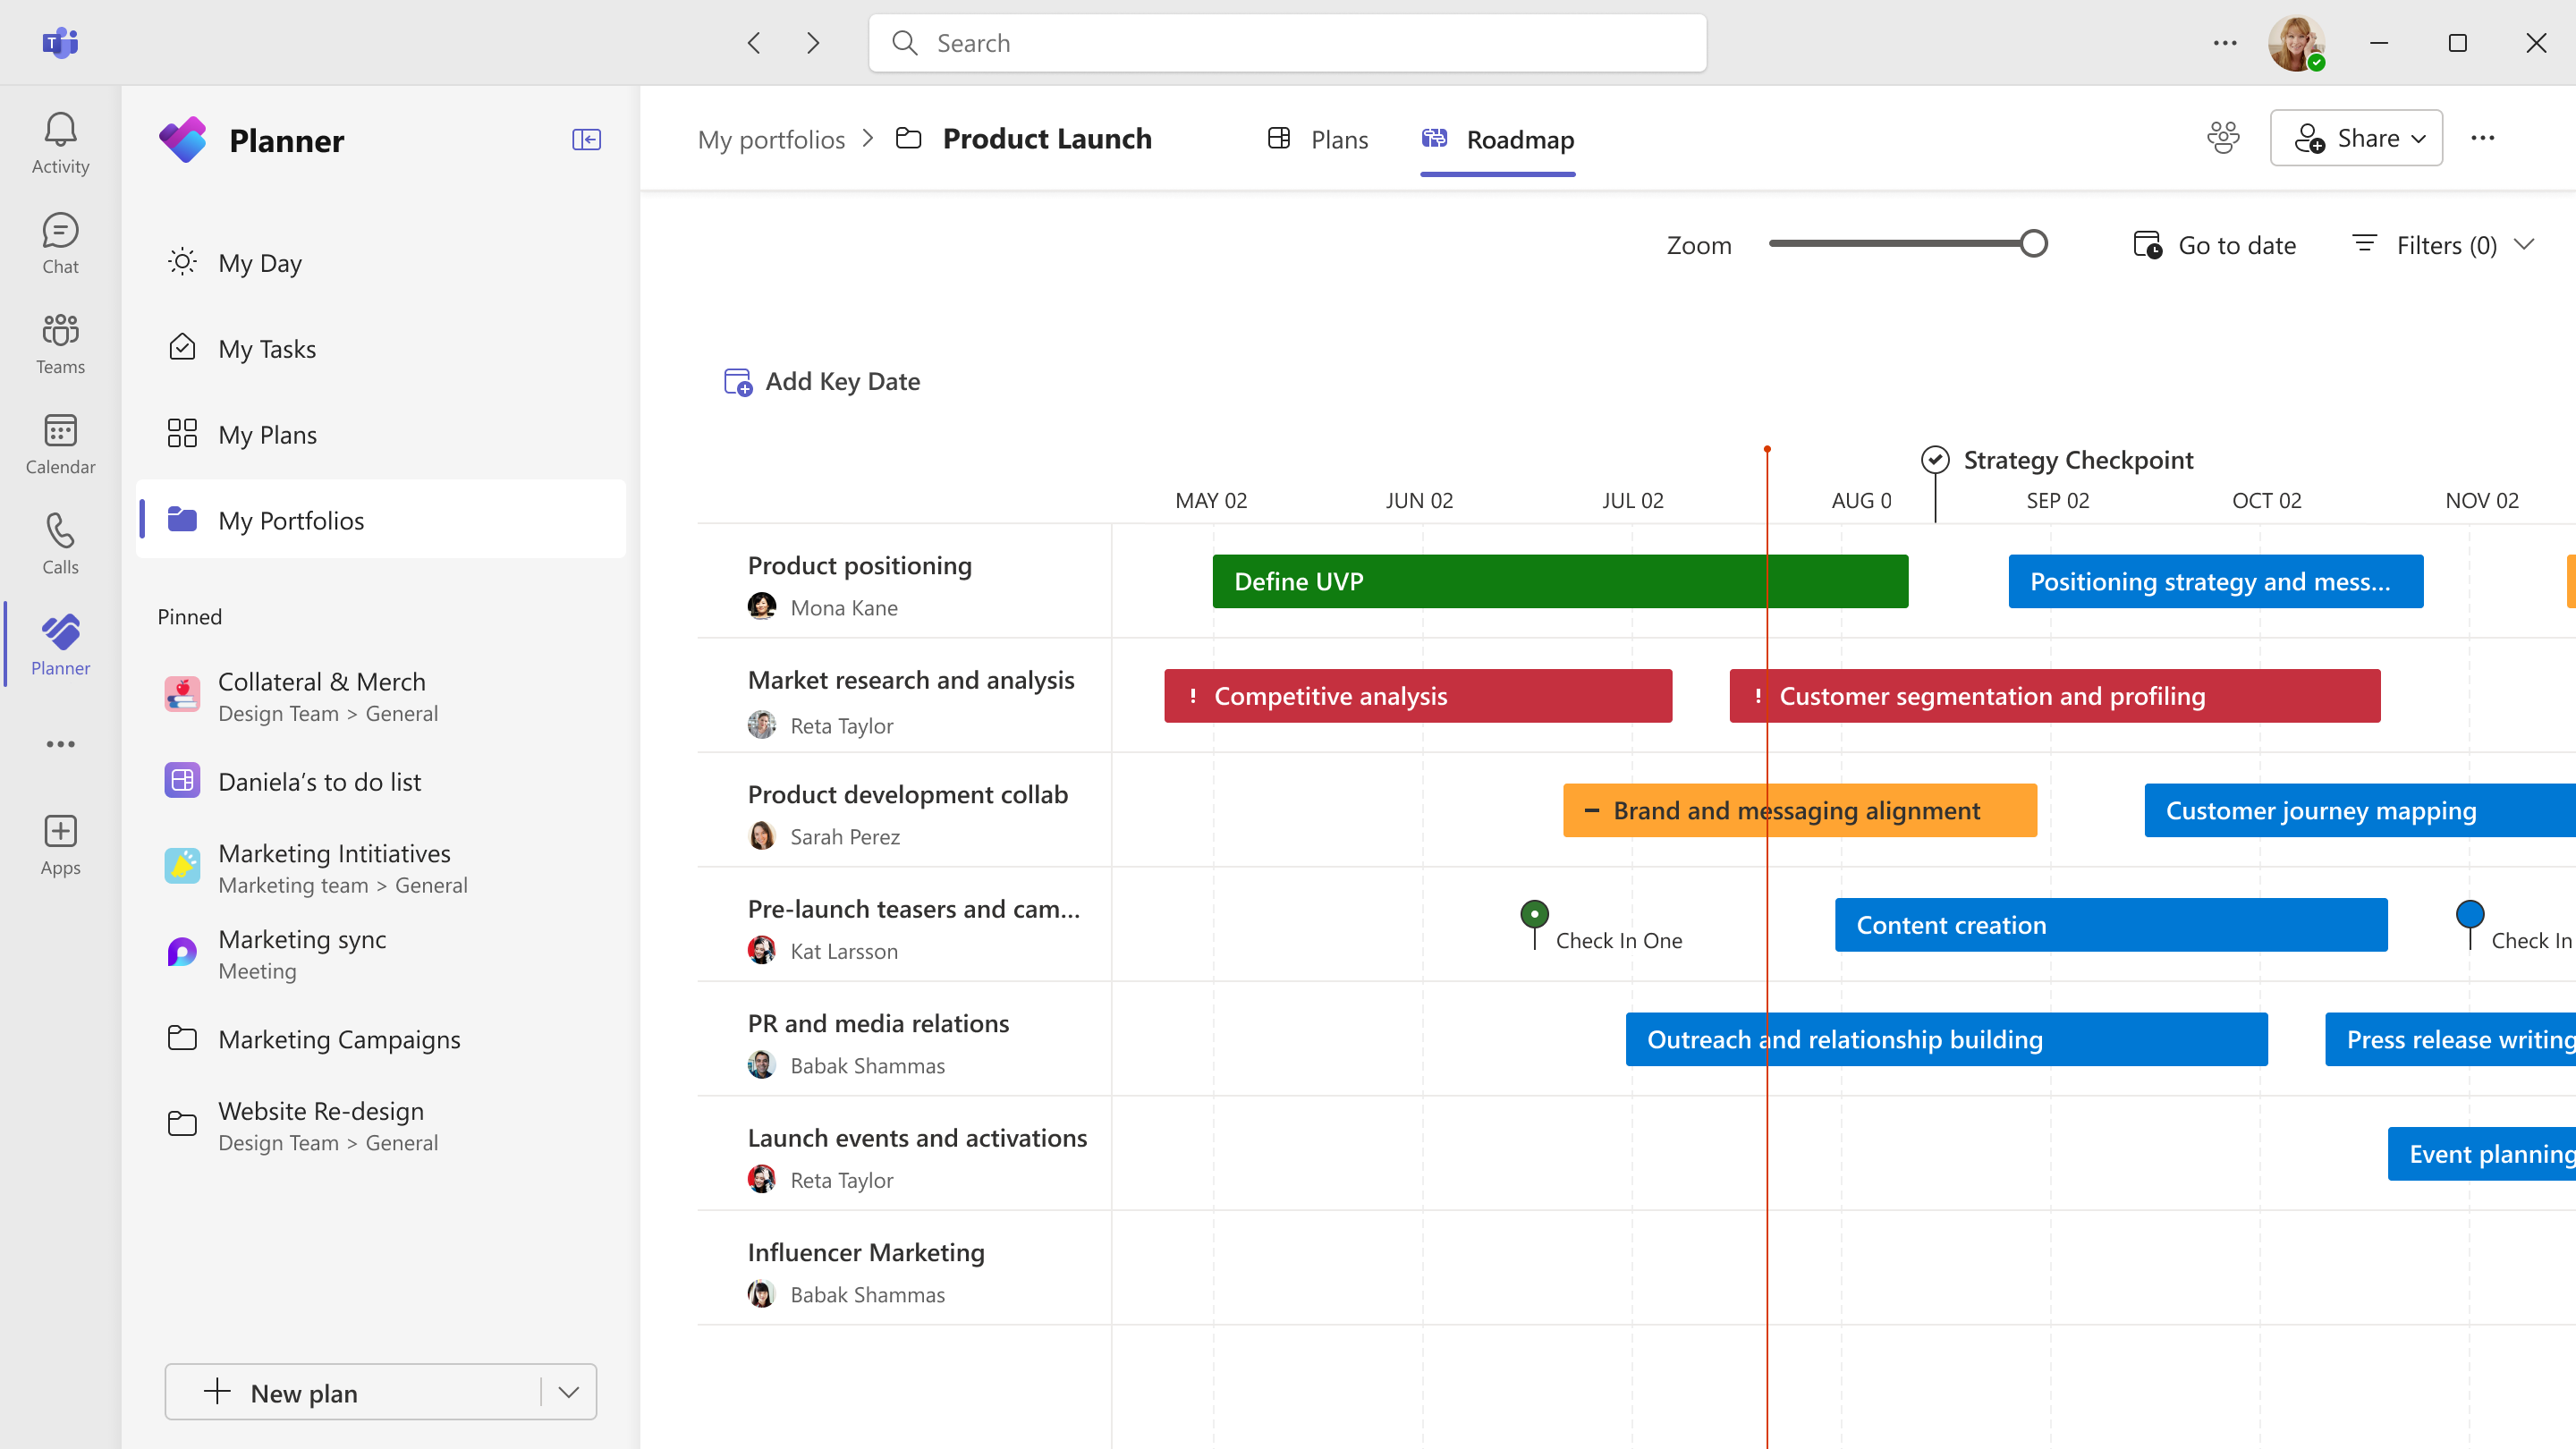
If you want to view your portfolio of plans and their associated tasks as a visual timeline, select the Roadmap tab. Each plan that you've added to your portfolio will automatically appear as a distinct row in the roadmap view.
If you're already familiar with the Roadmap feature in Project for the web, the Roadmap view in Planner shares many of the same or similar features, such as the ability to:
-
Add tasks to a roadmap
-
Add key dates to track milestones
-
Update the status of individual tasks
-
Edit plan row details
-
Customize the roadmap view
Add tasks to a roadmap
To add specific tasks to your roadmap and better track those tasks within a plan:
-
Select the plan, then select the Add row item button in the header.
-
In the Update items side pane, you'll see a list of all the tasks in your plan. Select the tasks you want to track.
-
Select Update to add these tasks to the corresponding plan’s row in the roadmap.
Add key dates to track milestones
In the Roadmap view, you can also add important dates to help track key milestones. To do so, select Add key date in the header of the Roadmap tab, and then enter the relevant details.
Update the status of individual tasks
To manually update the status of your individual tasks:
-
Select the task phase in the roadmap view.
-
Edit the phase details in the resulting pop-up. Here, you can choose from the following options: Not set, On track, At risk, High risk, and Done.
Edit plan row details
Select the plan name to update details, such as Plan name, Owner, and Row items. You'll also see options to Refresh plan data and access the Plan link.
Customize the roadmap view
You can also customize your roadmap view using the options in the top-right corner of the Roadmap tab. These options include:
-
Change the timeline zoom
-
Filter by owners
-
Jump to a specific date
Recreate an existing roadmap as a portfolio
Important: As of August 1, 2025, Microsoft is retiring Project for the web and the Roadmap experience. After this date, users will be redirected to Planner.
If you're currently using the Roadmap feature, we strongly recommend recreating your existing roadmaps as portfolios in Planner to ensure continuity and avoid any disruption in tracking your workflows. To help you stay in control of your plans, below are the steps you will need to take—including helpful notes and tips—to recreate your existing roadmaps as portfolios in Planner.
Create your portfolio in Planner
To begin, follow the steps above to create a portfolio in Planner. When recreating an existing roadmap, keep the following guidance in mind:
-
We recommend that you use the same name for your new portfolio to help maintain continuity and user familiarity.
-
If you are recreating a shared roadmap, we recommend selecting the same Microsoft 365 Group to maintain your existing collaboration settings and avoid having to re-add individual members.
Note: Portfolios can't be pinned as a tab in Planner in Teams. Once the Roadmap feature has been retired, existing Roadmap tabs will no longer open. Instead, you will need to open your portfolios via Planner in Teams or Planner for the web.
Add plans to your portfolio
Next, follow the steps to add plans to a portfolio. When recreating an existing roadmap as a portfolio in Planner, it's important to note that:
-
The process for adding a plan to your portfolio is similar to connecting a project to a row in the Roadmap experience. However, in Planner, when you add a plan to your portfolio, a new row will automatically be added to the roadmap view, so you no longer need to create one manually.
Build out your roadmap view
After the plans have been added, follow the steps to build a roadmap view. When building out your roadmap view, please consider that:
-
Adding relevant tasks to each plan's row, setting key dates, and updating the status of tasks mirrors the familiar layout and tracking experience as the Roadmap experience in Project for the web.
-
In the roadmap view, each plan is mapped to a single row. You cannot create multiple rows for the same plan, so we recommend adding all relevant tasks for a plan to the specific row to ensure complete visibility and tracking.
Share your portfolio
Follow the steps to share a portfolio. When recreating an existing roadmap as a portfolio in Planner, it's important to note that:
-
The sharing experience for portfolios in Planner works similarly to the sharing experience for roadmaps in Project for the web. We recommend sharing the new portfolio with the same group that the original roadmap was shared with to ensure seamless collaboration.

