

Barcodes
Word no longer has a built-in barcode tool. However, you can still create barcodes in Word using the DisplayBarcode and MergeBarcode field codes.
These field codes support several types of barcodes, including UPC, Code 39, and Code 128.
The earlier Postnet barcode that supported ZIP and ZIP + 4 has been discontinued as of January 2013, at least for postal discounts. It's been replaced by Intelligent Mail barcode. If you need to create postal barcodes, the US Postal Service offers a number of resources to help you. There are also third-party suppliers of add-ons and tools for postal barcodes.
Note
This content applies to Word for Windows (including Word with a Microsoft 365 subscription). The steps and options may differ in Word for Mac or Word for the web.
Creating labels with barcodes
You can create labels with barcodes using DisplayBarcode and MergeBarcode. This example uses multiple MergeField fields, so it uses DisplayBarcode.
Use DisplayBarcode if you want a barcode with a fixed value. For info and examples, see Field Code: DisplayBarcode.
These steps use an Excel spreadsheet as the data source for the labels. The merge creates labels with the human-readable name and address, and a Code 128 barcode underneath with first name, last name, and city. The field names are unique to whatever Excel data source you're using. The ones here are just examples.
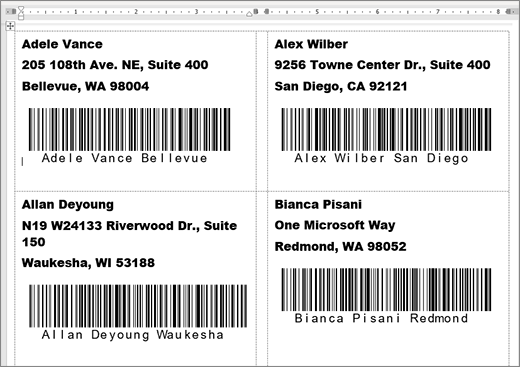
For guidelines on creating a spreadsheet with a mailing list, and more details on mail merges, see Create and print mailing labels for an address list in Excel.
Note
Field codes and barcode types are not case sensitive.
In Excel, prepare your worksheet, and name the range. For more info, see Create and print mailing labels for an address list in Excel.
Go to Mailings > Start Mail Merge >Labels.
Choose a label vendor and product to use. If you don't see a list of label vendors, select Options.
If you don’t see your product number, select New Label and configure a custom label.Select OK.
Connect the data source in Word.
Go to Mailings > Select Recipients.
Select Use Existing List, and pick your Excel file.
In the Select Table dialog, select the worksheet or named range that contains your mailing list, make sure First** row of data contains column **headers is selected, and then select OK.
If needed, select Mailings >Edit Recipient List and remove anyone you don't want in the list.
Click or tap in the first label of the document.
Insert an
«AddressBlock»on the top of the label. For more info, see Create and print mailing labels for an address list in Excel.Select Enter, and then press Ctrl + F9 to open a Field.
Type
DisplayBarcode". Include the quote.Press Ctrl + F9, and type
MergeField FirstName.Move your cursor outside the right curly brace, and press Ctrl + F9 again.
Type
MergeField LastNameand move cursor to the right again.Press Ctrl + F9 and type
MergeField City. Move the cursor to the right outside the curly brace.Type a space and a quote, then the barcode type, and any switches like
" Code128 \t \h 1440 |. End with a vertical bar.Your field code should look like this:
{ DisplayBarcode "{ MergeField FirstName } { MergeField LastName } { MergeField City }" CODE128 \t \h 1440| }
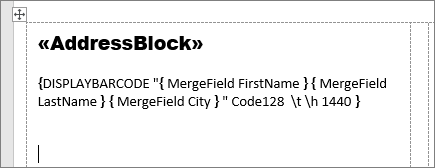
Select Mailings > Update Labels. The other labels on the page should be filled in.
To test your merge, select Preview Results.