Video: Add accessible tables and lists to email
Applies To

Adding structure (such as bulleted lists and tables) to text helps communicate order and relationships in the text for screen readers and Braille writers.
Create a bulleted list
-
Select Message > Bullets.
-
Enter each list item in a separate paragraph. To finish the list, press Enter twice.
Tip: You can also select existing text and then select Message > Bullets to turn it into a list.
Create a numbered list
-
Select Message > Numbering.
-
Enter each list item in a separate paragraph. To finish the list, press Enter twice.
Tip: You can also select existing text, and then select Message > Numbering to turn it into a list.
Create a table
-
Select the location where you want to add the table.
-
Select Insert > Table, and select the number of columns and rows you want.
-
Add text to the table.
Format an accessible table
-
Select anywhere in the table, and then go to Design.
-
Select the design features you want, such as Header Row, Banded Rows, and First Column.
-
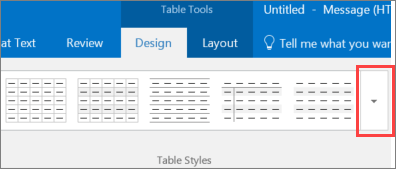
To see more Table Styles, select Design > More button.
-
Select a style with strong contrasting colors.
Want more?
Sometimes email messages contain information that requires more structure than simple text.
By creating a bulleted list or a table, you can communicate order and relationships in the text more effectively.
For example, you might send someone a list of things that are important for a shared project.
But handmade lists can be hard to read and difficult for accessibility tools to process correctly.
Outlook and Word have built-in features that are designed to make lists easy to create, and be more accessible for people using screen readers and Braille writers, so they can be read appropriately.
Here, for example, a screen reader would say:
“List, 1, Open a new email message, type the items for your list, then select them.
2, go to Message, Bullets.”
Tables provide even more structure for communicating relationships between pieces of information.
You can create tables in Outlook or paste them in from other Office apps, such as Word.
Office apps work together so that screen readers continue to recognize the text seamlessly.
This table connects each item in a monthly budget to an amount of money for that item: $800 for Rent/mortgage and $50 for Gas.
To get the most out of table information, you need to know what kind of information is in the columns.
Here, I have just 2 columns: an item and an amount.
The names at the top of these columns are called “table headers”, or sometimes “column headers”
Screen readers use the information in the header to define a position in the table.
In fact, many screen readers repeat the header for the listener, so someone can always find out that $120 is the Amount for the Credit card item.
However, for a screen reader, the Header is not simply the words in the first row of a table. It is a specifically-defined area.
I’m going to add defined headers to this table, so that “Item” and “Amount” are understood that way by a screen reader, and more easily identified visually.
With a cell selected, I’ll go to Table Tools….
Design...
And then select Header Row.
I also keep Banded Rows and First Column checked, because they can make a table easier for everyone to read.
Next, to make this table easier to navigate for everyone, I’ll pick a table style with good color contrast.
And here’s my result!
Using built-in features to organize text information in Outlook helps you communicate more effectively with everyone.
For more information, go to aka.ms/OfficeAccessibility


