Viva Connections on your desktop
Applies To
Viva Connections brings your organization's internal resources into Microsoft Teams where it is easier to share, collaborate, and chat all in one place. Discover tools that help you complete daily tasks in the Dashboard, catch up on organizational, boosted, and other news from SharePoint sites in the News reader, and get easy access to relevant content in Resources. Use navigational options to go to get to more popular content like your organization’s landing page and other Viva experiences.
Notes:
-
Only owners and members will be able to edit the Connections experience for their organization.
-
The news reader experience is being rolled out to users that will replace the current Feed experience across desktop, web, and mobile devices. This update is planned to roll out to all customers across all devices by the end of April 2025.
Overview of the Connections desktop experience
Accessing Connections via Teams, SharePoint home page, or Viva Suite home website provides a consistent experience through multiple entry points.
-
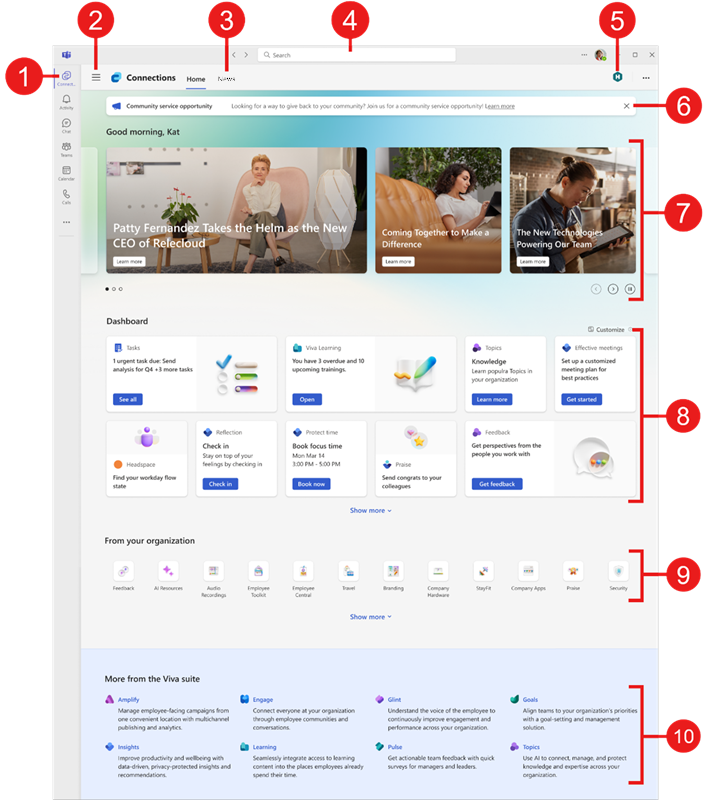
Navigate to the landing experience in Teams: Select the icon your organization uses for Viva Connections from the menu in the app bar. The entry point will be the same for both desktop and mobile experiences. If your organization has not done so, you can pin Connections to the Teams app bar for easier access.
-
Easily access other Viva experiences: If your organization uses other Viva experiences, select the three bars to see which experiences are available. Select a Viva app to switch between tools.
-
Catch up on news in the news reader: SharePoint news is presented from the user’s followed sites, frequent sites, trending sites, home site, organization news sites and news posts published by people the user works with.
-
Scoped search within Connections: Users can search within Connections when using the search bar while in the Connections experience. As users' type, the option to search for results within Connections (or Teams) displays.
-
Navigate to your organization’s main landing page: If your organization has a custom landing experience, you’ll see a link that displays as an icon and label in the top-right corner. When you select the link, you’ll be taken to your organization’s landing page in Teams.
-
Review Announcements: Important time-sensitive notices targeted to users within the organization appear at the top of the Connections experience (Microsoft Viva suite or Viva Communications and Communities license required).
-
Catch organizational news: The spotlight dynamically displays content from the home site, news from SharePoint sites, and links to articles or other SharePoint sites.
-
Use the dashboard to access tasks and tools: Interact with cards on the dashboard by selecting them to complete daily tasks and access popular tools. Your organization will add cards that have been selected specially for your role and may display dynamic content that changes depending on your role. Users will also be able to customize their dashboard to a degree by adding personal cards, repositioning frequently used cards, and hiding those rarely used. These custom changes will only apply to the user’s dashboard.
-
Access popular destinations within your organization: In the resources section, you’ll find links to more portals and destinations provided by your organization.
-
See what other Viva experiences are available: Your organization may use more than one Viva experience to help with training, communications, knowledge-management, or well-being. All available Viva experiences will display below your Resources. Select one to navigate to a different experience. Learn more about other Viva experiences.
For more information on how to access Connections from your desktop, see the section on using Connections from your desktop.
Connections news reader
Note: The news reader experience is being rolled out to users that will replace the current Feed experience across desktop, web, and mobile devices. This update is planned to roll out to all customers across all devices by the end of April 2025.
The news reader provides users with SharePoint news from across the organizational sites, boosted news, user’s followed sites, frequent sites, and people the user works with.
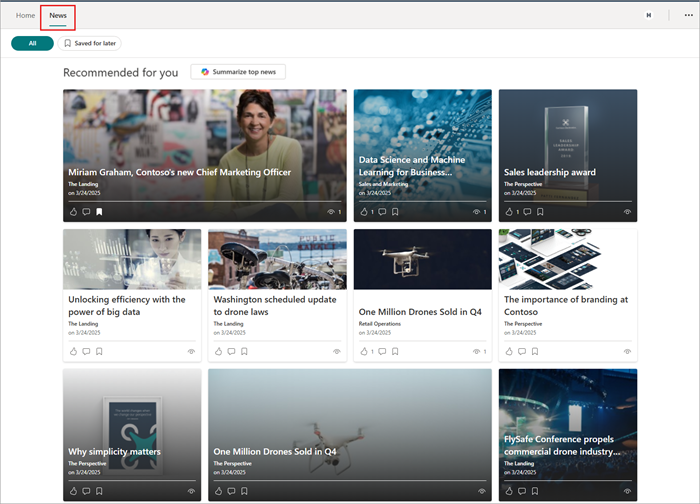
News items are presented as news cards in a neat and easy to access immersive reader experience through the News tab in the Connections experience tab.
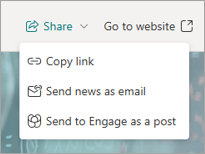
When users access the News tab, they see their news feed displayed in grid layout on cards. Selecting a card opens the news within the Connections app itself in an immersive reader experience with access to sharing options and the ability to access the news item in the browser.
Users can select the thumbs up icon (
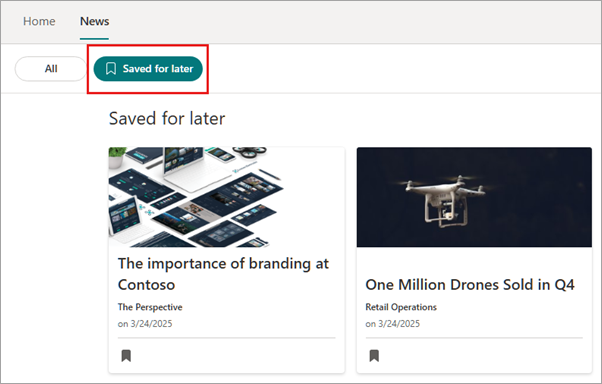
News items that have been bookmarked can be accessed by selecting Saved for later at the top of the News reader experience.
Users will be able to summarize the top news articles in their news feed using the Summarize top news button located under the All section of the News tab. See the article on Copilot powered news summary, and the Copilot powered news summary FAQ for more information.
Note: The Copilot powered news summary is currently only available through the desktop version of Microsoft Teams and is rolling out to users with a Microsoft 365 Copilot license.
Connections Dashboard
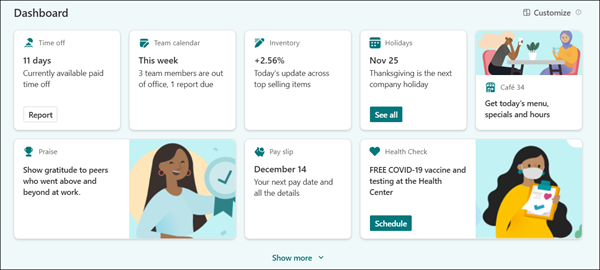
The Connections dashboard has been set up by your administrator to provide access to cards that can help you complete popular tasks and access tools that are relevant to your role. Many cards feature dynamic content that changes depending on time-sensitive tasks like completing upcoming training courses, approving documents, learn about upcoming events, and more. Some dashboard cards may be targeted to specific user groups at the organization, so only cards relevant you will be seen.
Users can perform some customization of their dashboard by adding, hiding, showing, and moving cards. These changes made will only appear to the user and could be overridden by updates sent out by the organization. See the article on HERE IS CONTENT MISSING - JUST NOTICING AS I REVIEW WHERE TO ADD THE CHANGE I REQUIRE.
If your dashboard has more cards that can be shown within two rows, select Show more to expand your dashboard to reveal additional cards.
For more information on audience targeting, see how audience targeting is applied to cards in the dashboard. Refer to the available dashboard cards in Viva Connections for more information on the type of cards available.
Customize your dashboard card layout
There are several customization options available to you on your dashboard. Add a dashboard card to manage a specific task, reorder the dashboard cards in order of your priority, hide cards that you rarely use or show your hidden cards. Any changes you make to the dashboard will apply across your desktop and mobile instances and will only affect your dashboard view.
Note: Customizations to the dashboard can take up to 24 hours to synchronize across platforms.
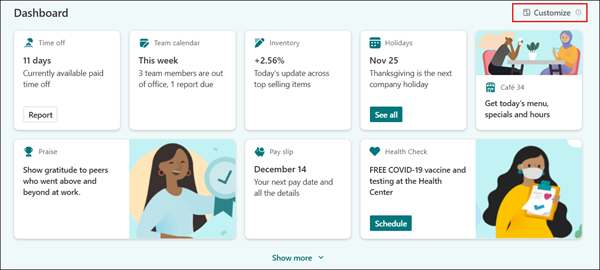
To begin, select the Customize icon above the dashboard cards.
Add a personal dashboard card
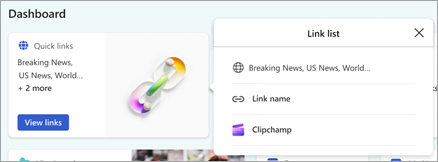
You can add a Quick Links card to your dashboard that will allow you to add a collection of links to your favorite files, apps, and sites.
-
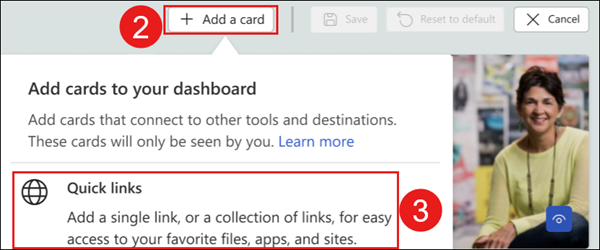
Select Customize above the dashboard.
-
Select Add a card.
-
Select Quick links.
-
The card will be added to your dashboard and the properties pane will open.
-
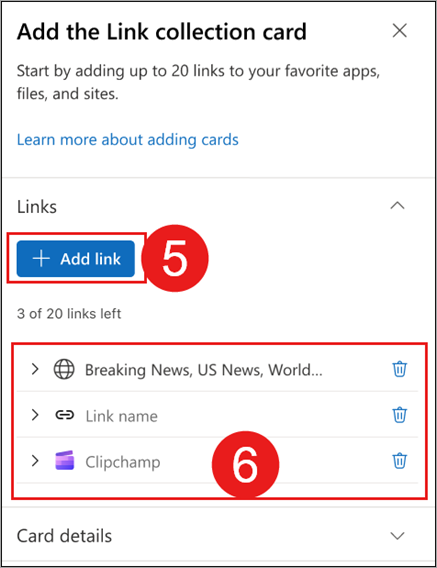
Under links, select + Add link to add a URL, site page, or files. Added links show below the + Add link button. You can add up to 20 links.
-
Once added, links can be edited in the following ways:
-
Rearrange – Select and drag to the left of the link to reposition it within your quick link list.
-
Delete – Select the trashcan to delete the selected link.
-
Edit – Select the arrow to edit the link URL, title, and icon.
-
-
Under Card details, you can edit the size, title, icon, and image displayed on the Quick Links dashboard card.
-
When finished, select the X in the upper-right of the property pane to close.
-
Select Save.
Note: To access the settings again for a user added dashboard card, select Customize, then hover over the card and select the edit icon.
Move dashboard cards
-
Select Customize above the dashboard.
-
Select and drag the dashboard card to its new location in the dashboard.
-
Select Save.
-
In the confirmation, select Save to save your changes to the dashboard for desktop and mobile devices.
Hide dashboard cards
-
Select Customize above the dashboard.
-
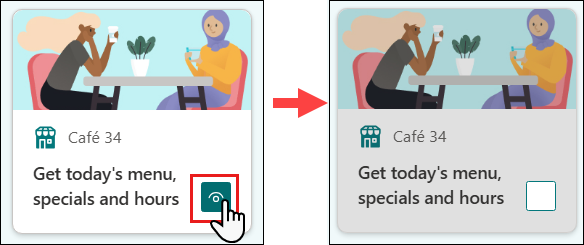
Select the visible icon in the lower-right corner of a dashboard card. The card will become greyed out, and the visible icon will disappear.
-
Select Save.
-
In the confirmation, select Save to save your changes to the dashboard for desktop and mobile devices.
Show hidden dashboard cards
-
Select Customize above the dashboard.
-
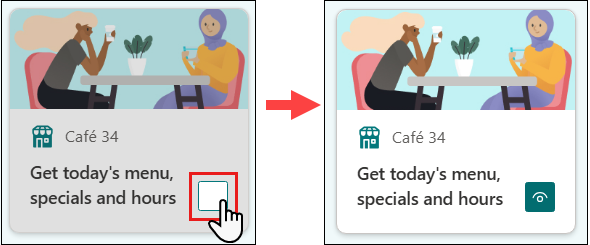
Select the empty box in the lower-right corner of a dashboard card. The card will no longer be greyed out, and the visible icon will appear.
-
Select Save.
-
In the confirmation, select Save to save your changes to the dashboard for desktop and mobile devices.
Reset dashboard cards to default
-
Select Customize above the dashboard.
-
Select Reset to default.
-
Select Save.
-
In the confirmation, select Save to save your changes to the dashboard for desktop and mobile devices. Your dashboard will be reset to the default view created by your organization.
Spotlight
The spotlight sits at the top of the Viva Connections experience on the Dashboard tab. It promotes news published to existing SharePoint home sites from across your organization, providing a steady stream of information.
Select news stories as they cycle through or use the navigation controls under the spotlight to scroll through the banner.
Note: If no news is available to display from across the organization, this section will collapse.
Announcements on Connections desktop
At times your organization may use the announcements feature to share time-sensitive messages with users. These messages will appear to users within Connections on desktop or mobile devices. Frontline workers will also see any Microsoft Teams Channel announcements display within Connections in the announcement banner on desktop and mobile experiences. Frontline workers can then select the link within the announcement in Connections to be redirected to the Teams Channel where the announcement was made. For more information, see how Teams Channel announcements display in Connections for frontline workers.
Note: Users are required to have a Microsoft Viva suite or Viva Communications and Communities license to utilize the announcements feature. See Microsoft Viva plans and pricing for more info.
View and dismiss Announcements
When your organization sends an announcement, it will appear above the News spotlight. Use the navigation controls to view multiple announcements.
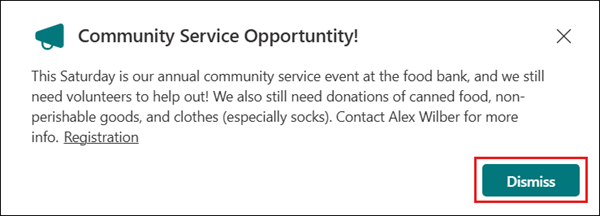
Select an announcement to display more information. The announcement will open in a small window and display the full announcement. To dismiss the announcement, select Dismiss.
Note: The sender of the announcement can disable the option to dismiss the announcement. If enabled, the announcement will be displayed until its expiration date.
When finished, select the X in the upper-right to close.
View all announcements and dismissed announcements
To view all announcements and dismissed announcements:
-
From the dashboard, select See all under the announcements banner.
-
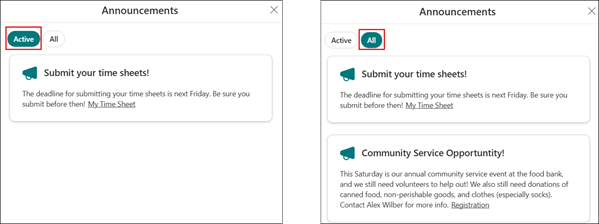
All active announcements will be displayed under the Active tab.
-
Select All to display all announcements that have not expired, including dismissed announcements.
-
When finished, select the X in the upper-right to close.
Viva Connections Resources
Resources provide links to the most popular sites at your organization and can be found below the dashboard of the Connections experience. Your organization may provide navigational links to other internal SharePoint sites or provide links to other resources. Some resources may be targeted to specific user groups at the organization, so only links relevant to you will be seen.
If there are more resources that can be shown, select Show more to expand your view to reveal additional resource links.
For more information on audience targeting, see how audience targeting is applied to links in resources.
Pin the Connections app to your Teams app bar
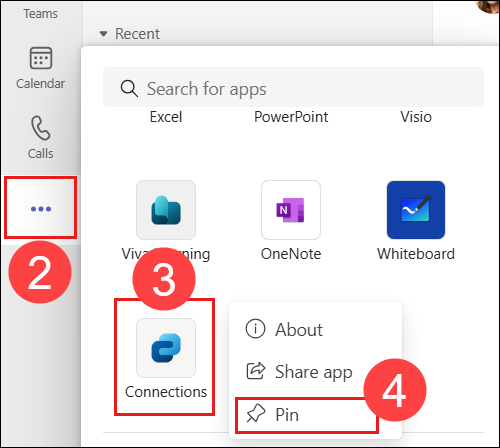
If your Connections app hasn’t been pinned to your Teams app bar, you can pin the app yourself using these steps:
-
Open the Teams app on your computer.
-
Select the ellipsis on your app bar to view more apps.
-
Scroll through the list of apps until you find Viva Connections (or the icon your organization is using).
Note: If you don’t find the app in the list, use the search bar to search for Viva Connections.
-
Right-click Viva Connections (or the icon your organization is using) and select Pin.
Learn More
Viva Connections on mobile devices
Use audience targeting in Viva Connections to personalize the experience
Use announcements in Viva Connections

