Stage your story in PowerPoint
What is PowerPoint?
PowerPoint is a presentation tool. Create slides to explain topics, research, or reports, and take notes directly under each slide to reference during your presentation. Later, present your professional project to a group using the slideshow feature! Enhance your presentations with many multimedia tools including transitions and animations. Use QuickStarter for some extra prep help!
After launching PowerPoint, you have three options. Let’s break down each one:
-
Choose Blank Presentation to put everything together yourself.
-
Choose to create your presentation from pre-designed templates. Search different themes in the search bar to find a template that best suits your topic material!
-
Choose QuickStarter to begin an outline of your presentation.
QuickStarter
If you select QuickStarter, you’ll be prompted to search for the topic you’re researching. From there, QuickStarter will walk you through some steps to choose other topics that relate to your primary topic. For example, if you search for “water cycle,” you’ll have the option to explore related topics like “changes over time.” Choose a look for your slideshow and select Create.
Just like that, QuickStarter will start an outlined presentation for you containing:
-
A title slide
-
A table of contents
-
A slide of key facts
-
A slide of related topics for research
-
Slides for each related topic, sometimes including pictures (from Creative Commons) and suggested talking points.
-
A slide listing works cited
Now you have a head start on crafting the rest of your story.
Adding new slides
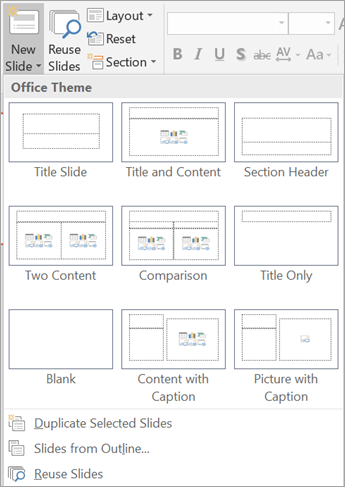
When you create your slideshow, there are quite a few slide types to choose from. Each time you want to create a new slide, choose the New Slide button in the Home tab and choose from options like Comparison or Section Header. You can also choose slides that are completely blank and customize them yourself.
To reuse a slide from this slideshow—or any slideshow you’ve made in PowerPoint before—select Reuse Slides to browse your recent slideshows and find the slide you need.
Adding text to slides
To add text to slides, select the pre-made template boxes or select Insert > Text Box. Click on where you’d like your text to appear and start typing. PowerPoint uses the same processing tools as Word, so some things should look familiar.
Note: Watch out for blue, gold, or red lines appearing under words as you type. These are from the built-in writing assistant, which flags potential spelling errors or offers grammar and writing style suggestions.
Adding pictures
To add a picture to a slide that does not already have a multimedia/photo box, select Insert, then Pictures for a local picture, or Online Pictures for pictures from OneDrive, Bing, or other sources.
Adding transitions to your slides
A transition is a short animation that plays as you move to the next slide. To add transitions, go to the Transitions tab and choose the one you’d like to play. Adjust its settings, like sound and duration—that's how long you want the transition to last. Select Apply to All if you want the same transition to play each time you move on to the next slide.
Adding animations to your slides
An animation brings your slide to life by moving text and elements around the slideshow or introducing new things in a visual way. To add an animation, head to the Animations tab. Choose one from the options and then edit its settings, like timing.
Write equations and solve them
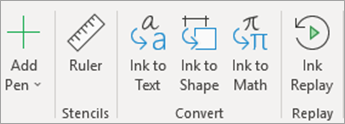
Presenting on mathematics? Select the Draw > Ink to Math button to input an equation in ink, convert it to text, and solve it. Select Equation Tools in the ribbon to play with more advanced math concepts like Integrals and Functions.
Replay your writing
Show how you solved something or demonstrate your thinking using Ink Replay in the Draw tab.
Add charts and 3-D models
Need to represent your findings visually? In the Insert tab, you’ll find options like SmartArt, Chart, and 3D Models.
-
SmartArt lets you add text to show the relationship or hierarchy between concepts.
-
Chart helps you choose from a variety of common ways to display data, like pie charts or line graphs.
-
3D Models displays a whole library of beautiful 3D images, shapes, and dioramas.
Using slide notes
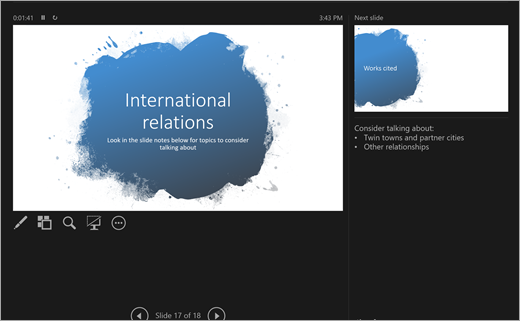
Below each slide is a place for notes. Here, you can add any notes you’ll need to help you during your presentation, like bullet points or a script. When you present, no one else will be able to see these notes except you.
To adjust your note settings, visit the View tab.
Starting your slideshow presentation
When presenting, you want to be able to show the biggest and most polished view of what you’ve created. Use Slide Show mode to present your slides in full screen to the class. To start the slideshow, go to the Slide Show tab, then select from the options in Start Slide Show.
Using slide timings
Not presenting your slideshow in person? Presenting in person, but don’t want to worry about clicking to change slides? Either way, you can use slide timings to record and specifically time a slideshow. Select Rehearse Timings to create the right pace. Select Record Slide Show to record a narration of the entire slideshow, or just for one slide.
When you start your slideshow, the timings and recordings will start, too.
Presenter view
The Presenter View is one of the most helpful features of PowerPoint. While you’re connecting and presenting on another screen, your own screen becomes the Presenter view. Here, you can get “behind the scenes” control of your slides, view your private presentation notes, and keep track of time.


