Customize an immersive event in Microsoft Teams
Notes:
-
Organizing immersive events is available in Teams Premium, an add-on license that provides additional features to make Teams meetings more personalized, intelligent, and secure. To get access to Teams Premium, contact your IT admin. Alternatively, ask your admin to assign the free Microsoft Mesh Trial license to get started quickly.
Teams Premium or the Microsoft Mesh Trial license isn't required for attending immersive events as a co-organizer or attendee.
Customize environments in immersive events to tailor the event space to your needs. Boost engagement by adding your own content and making the experience unique to your scenario.
Customize an environment
Make immersive events more impactful with ready-made templates and no-code tools that help you design 3D environments featuring your brand, images, videos, 3D models, and more.
Only organizers and co-organizers can customize the event when scheduling it in Teams. Any changes to the event space must be saved at least 10 minutes before the event starts.
Important:
-
If you plan on adding custom content to your event, set up a SharePoint or OneDrive folder before the event with the content you plan to use. This will ensure easy access to URLs when adding objects to your event.
-
Direct upload of content files for customization isn't supported.
-
Customizing an event is unavailable after the event has already been started once.
1. Join the customization session
To start customizing an immersive event space, join the customization session by editing the event in your Teams calendar. In the customization session, you'll appear as an avatar in the environment you selected when scheduling the event.
To join the customization session for an immersive event:
-
Select Calendar
-
Double-click an immersive event.
-
Select Manage event
-
At the top of the event details, select More actions
-
Select Join now to enter the customization session.
Important: The Customize in immersive
2. Edit the immersive event space
Once you're in the customization session, you can start making changes to the environment around you.
To change the event space:
-
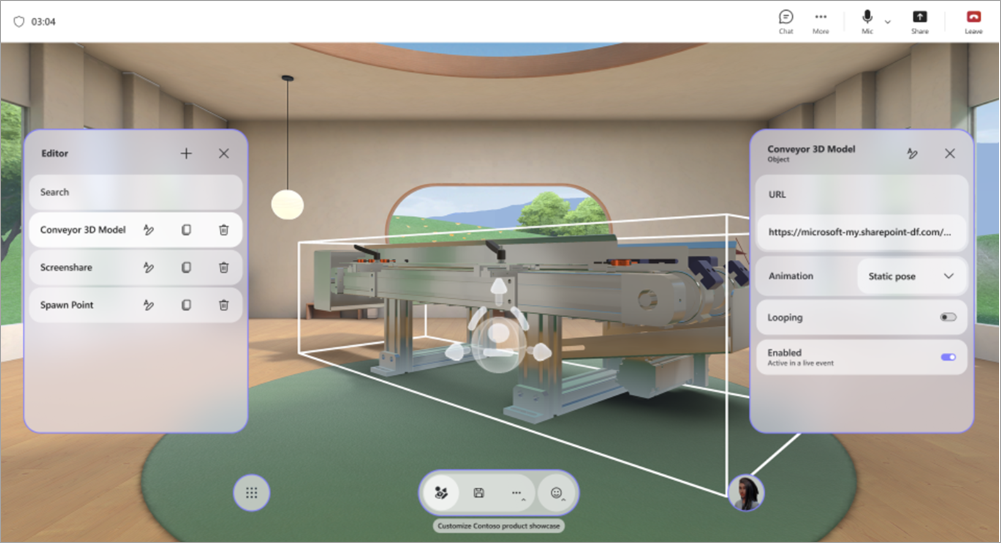
Select Editor in the menu bar.
-
In Editor, select Add an object to the environment
-
In Catalog, select an object to add it to the environment.
-
Select the gizmo at the center of the object to reposition, resize, or move it.
-
Configure other object details, like its Visibility, whether it's Enabled and active during the event, and more.
-
To delete an object, select Delete
3. Add custom content objects
From the Catalog, add custom images, 3D models, and more from OneDrive or SharePoint.
To add custom objects:
-
In Editor, select the object type you want to add to your space (i.e., Image, 3D Model, Video, Audio).
-
In your web browser:
-
Open the OneDrive or SharePoint file folder with content you saved to add to the space.
-
Hover over a file and select Share
Important: Make sure the expected audience of your event has access to the file in OneDrive.
-
-
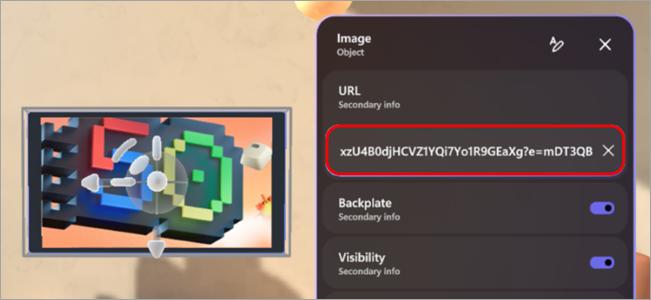
In the customization session, paste the content's URL into the URL field on the object details panel.
-
Press Enter to load the content.
Repeat the steps above to create your experience.
Tips:
-
For the best event experience, add three or more objects containing content relevant to your scenario.
-
To create an interactive experience, use action groups to connect multiple objects and control how they're displayed. This allows you to display sequences of object content for the audience.
4. Save your changes
When you finish customizing the environment, save your changes by selecting Save
Customizations can be saved to a single event but can't be reused across multiple events.
Important: Make sure to save all customizations at least 10 minutes prior to the event start time.
Customizable objects
There are many options for adding objects to your event. Any event can have multiple objects. You won't be able to preview your objects during the customization session but you can join the event early to preview them.
Learn more about what each object does and how you can customize it.
|
Object |
What it does |
Customizable options |
|---|---|---|
|
Screenshare |
Allows presenters or participants to share their screen content with the immersive environment. Screenshare audio isn't supported. |
|
|
Social ice breaker |
Generates random icebreaker questions to facilitate conversations and help people get to know each other better. |
|
|
Spotlight point: attendee |
Determines where an attendee will appear and the direction they'll face when they're called on after raising their hand. |
|
|
Spotlight point: organizer |
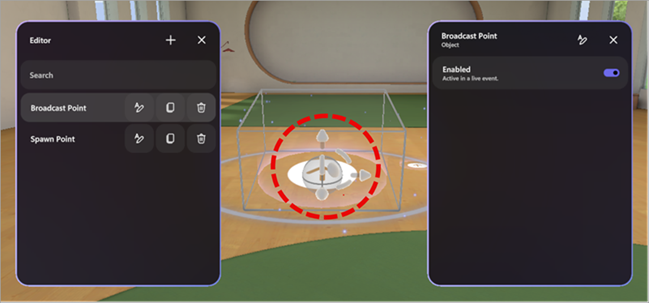
Determines the location and orientation of an organizer when they broadcast. |
|
|
Seat |
Represents a virtual seating position that participants can occupy during the event. |
|
|
Text |
Displays static or dynamic text within the environment, often used for labels, instructions, banners, or titles. |
|
|
3D model (.glb file) |
Renders and displays 3D models in the environment using the .glb format. Participants can view and interact with it. |
|
|
Audio player (.mp3 file) |
Plays audio clips (e.g., music, narration) embedded in the environment. |
|
|
Spawn point |
Determines where an attendee appears and what direction they're looking in when they join an immersive event. |
|
|
Image (.png, .jpeg file) |
Displays 2D images within the environment and is useful for branding, signage, or visual aids. |
|
|
Video player |
Plays video content on virtual screens or surfaces within the immersive environment. |
|
|
Text button |
Triggers other objects to be played as part of an action group. |
|
Action groups in immersive events
Build interactive experiences without coding. Create opportunities for dynamic audience engagement by allowing them to trigger animations, sounds, and visual cues during live events.
There are endless creative possibilities with action groups. For example:
-
Event welcome moments: Turn on audio, add a welcome image and confetti, and start a screenshare.
-
Show a jet engine working: Use a button to trigger a model of a jet engine to appear, starts its animation, and play audio.
-
Take a casual quiz: Write a question on the wall and place answer buttons to show an image of a checkmark or incorrect answer.
-
Run a show with content switches: Switch URLs for images and videos to display new content to your attendees during an event.
With action groups in immersive events, you can create interactive experiences without writing code. Control object states and trigger sequences during an event automatically or via clickable buttons.
Object states include:
-
Enabling or disabling objects (e.g., show/hide a 3D model)
-
Controlling animations (start, stop, loop)
-
Playing or stopping media (audio, video)
-
Switching URLs for media dynamically
Group actions together and connect them to a button or play them from the action groups panel during a live event.
|
Object type |
State options |
|
Audio |
Enabled, play state, volume, URL |
|
Icebreaker |
Enabled |
|
3D model |
Enabled, animation, looping |
|
Text |
Enabled, text |
|
Video player |
Enabled, play state, volume, URL, looping |
|
Screenshare |
Enabled |
|
Text button |
Enabled |
Create action groups
-
In a customization session, add objects to your space.
-
Select Action groups in the menu bar.
-
Select Create new action group
-
Select Add content
-
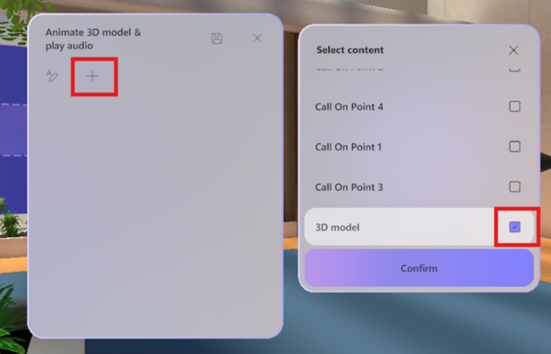
Select the object in the list and select its controls.
Note: In this example, the 3D model is disabled and won't be visible in the space. The action group will enable it once the action group is triggered, so the enabled state is turned on. Also, the animation will start looping once the action group is on.
-
Add any additional objects to the action group by repeating steps 4-5.
Submit feedback
To submit feedback about your immersive event experience, select Menu
To give feedback about the Teams experience, such as scheduling or the event window (including the Join screen and features like audio, chat, or screenshare), select Settings and more
Related topics
Upload and save files and folders to OneDrive

