Manage town hall emails in Microsoft Teams
When you publish a town hall in Microsoft Teams, attendees will automatically receive email invites and recording updates from Teams.
Customize emails or turn them off completely from the event details in your Teams calendar.
Edit town hall emails
In Teams, town hall emails are generated using a template that automatically fills in details from the event scheduling form.
Keep the emails as they are or customize them from the event details in your Teams calendar.
Email invites
Teams email invites will contain important details, including the event name, date and time, and description. They’ll also reflect your event’s customized theming.
To add or change details, edit the invites before publishing your town hall.
To edit town hall email invites:
-
Go to your Teams calendar.
-
Open an existing town hall or schedule a new one.
-
Select Emails.
-
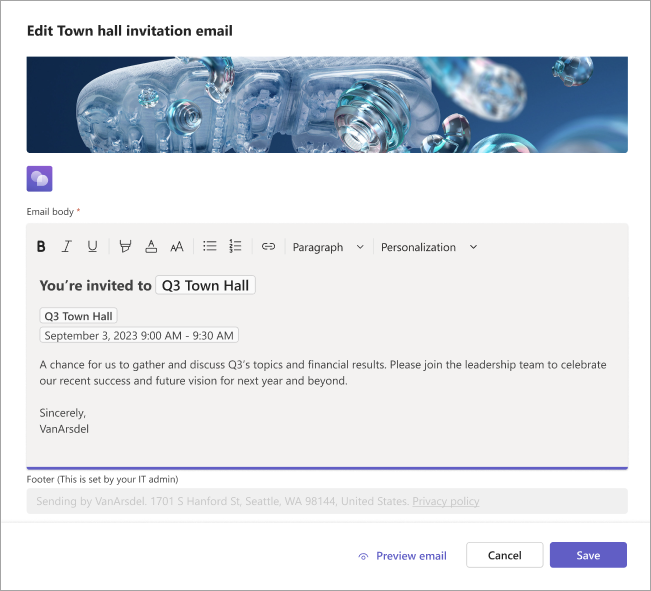
In the Event invitation row, select Edit.
-
Make changes in the email template.
-
Select Preview email to see how the email will appear to invitees.
Note: The email preview might look different to some recipients depending on their email service and device.
-
Select Edit email to keep editing, Cancel to discard edits, or Save to apply your changes.
After you publish the town hall, attendees will receive an email invite.
Event recording emails
After your event ends, you can publish the event recording for attendees. Attendees will automatically receive an email notifying them that the event recording is available.
Add follow-up details, links, and more by editing the event recording email.
To edit the event recording email:
-
Go to your Teams calendar.
-
Open the town hall details.
-
Select Emails.
-
In the Event recording available row, select Edit.
-
Make changes in the email template.
-
Select Preview email to see how the email will appear to invitees.
Note: The email preview might look different to some recipients depending on their email service and device.
-
Select Edit email to keep editing, Cancel to discard edits, or Save to apply your changes.
Turn off town hall emails
Town hall emails are turned on automatically when you create a town hall. You can turn them off at any time before you publish the event site.
To turn off town hall emails while scheduling a town hall:
-
In the scheduling form, go to Details > Invite attendees.
-
Turn the Enable attendees emails toggle off.
-
Select Save
To turn off town hall emails for a scheduled town hall:
-
Go to your Teams calendar.
-
Right-click a town hall and select Manage event
-
Go to Details > Invite attendees.
-
Turn the Enable attendees emails toggle off.
-
Select Save
Important:
-
Changing this setting will turn off all town hall emails, including email invites.
-
You can only change this setting before the event site is published.


